 What is multiple exposure:
Before you start talking about multiple exposure you need to make a necessary and indispensable clarification.
There are two ways to get two or more exposures on a frame:
The first is described in detail in this article and is the only one that allows for a single RAW file joining selected exposures before making the photographs as if a single shot had been executed;
The second is due to the union by means of the function “image overlay” from the “Retouch” menu of the camera (which can also be made at the table and two photographs of the time) away, each of which has generated a different RAW files , performed at different times and not consecutive (therefore with the ability to turn off and on the camera and wanting to change goal) but resulting in a RAW file will show in its Exif data track non-erasable this operation.
NB I always refer to the functions contained in the Nikon D800E camera that are the same or very similar to those of high-end Nikon cameras. I do not know the characteristics of other brands and models of cameras with which, however, I know you can do the same tasks.
Multiple exposure which we will cover below provides the union of two or more shots performed consecutively with the same camera and the same objective by enabling the “multiple exposure” from the “Shooting Menu” of the camera, function that allows you to make a number of shots, which can be from a minimum of two to a maximum of ten, overlapping them and creating a single RAW file which is absolutely identical, even in its Exif data, to a photo of a RAW file is executed with a single shot .
The primary and essential condition for obtaining this type of multiple exposure is the one between shots and the other the camera can not be switched off and on pain of cancellation of the operation set.
You can vary the exposure time and aperture, but you can not change the values of all other functions such as ISO sensitivity, white balance, exposure compensation, etc.
Finally, it is absolutely essential to set, before each series of shots, the function “multiple exposure” in the “Shooting Menu” of the camera and in this function, choose the “number of shots” that are to be layered and the “auto gain” that balance a bit ‘the exposure of individual shots being union, which personally do not recommend and we’ll see why.
NB: Only this type of multiple exposure is accepted and clearly described in the regulation of the most important international competitions for nature photography and / or underwater such as the Wildlife Photographer of the Year at the Natural History Museum of London, the GDT European Wildlife Photographer of the Year, Memorial Maria Luisa, Aspherical and others.
The double exposure in underwater photography:
I will only deal with the double exposure in underwater photography and not multiple exposures made by combining three or more shots because I find it sufficiently illustrate this training technique that has in itself such and so many difficulties of execution to discourage anyone to try their hand in making photographs diving with exposures more than two frames.
Because:
The reasons that lead us to use this technique are related to aesthetic taste and creativity of each photographer and aim to obtain an image that would otherwise be impossible to achieve with a single click. And ‘thus eminently important the skill of the photographer in making a photograph in his compositional complexity is pleasant and not overly contrived, so as to bring the viewer to consider it at first sight as the result of a single shot.
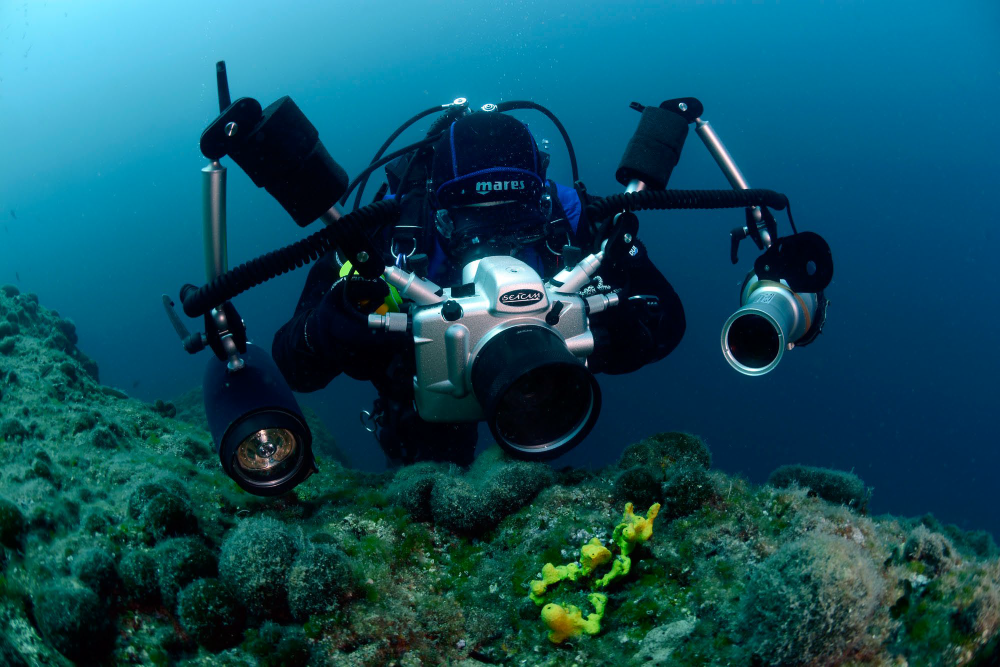
The photographic equipment selection:
Here, too, I will describe the double exposure performed with macro lens, leaving the one performed with wide angle which leads to higher production difficulties and therefore require a long preliminary internship with the macro.
Let’s move on then you need to consider:
- SLR camera that has features in its menu the ability to run multiple exposure (not to be confused with the image overlay);
- Macro lens (60, 105 or more depending on the subject or I am going to photograph);
- Waterproof case for camera with its flat port for macro lens chosen, making sure that the housing has the control buttons and the choice of the fully functional menu functions (there is nothing more hateful and frustrating fact of noticing sott ‘ water that one of the small buttons should not be to act perfectly on a command thus making vain our most good intentions to perform this technique !);
- Flash sufficient power to perform underwater shots adequately illuminated with the snoot;
- Arm / the flash for articulated in two or three fields long enough to allow positioning of the flash with the snoot exactly above the primary subject without disturbing it and allowing to obtain a correct snottata in the illuminated area size;
- Snoot of good quality which allows to obtain the correct illumination of the primary subject and that is equipped with appropriate light and pointing of interchangeable masks.
I believe that the quality and the flash output in combination with the snoot are crucial to the success of a proper double exposure!
Run mode:
The first choice.
When we are going to build an underwater photography with the double exposure is a priority choice of subject that we want to immortalize, choice to be made already in the preparation of our camera equipment as they will determine the type of goal that I will use to make my series photo. In fact, if my subject will be very small, ranging from one to three cm., Or if it will be particularly shy in getting closer I’ll have to necessarily use a lens of longer focal, see 105 micro or similar.
As if the subject will have larger, between 4 and 10 cm., And if you will allow me I will move closer to mount definitely a goal of shorter focal type 60 micro or similar.
At this point I imagine the reader’s question: what if I mount the 105 and then can not find the shrimp that I thought to immortalize but I am an 8cm nudibranch?
Unfortunately the answer is one that we all know when we photographed under water: in the sea there is never any certainty about what we will find under the surface and, allow me, this is his great charm!
Therefore, the deep knowledge of the dive site and its inhabitants in the various seasons of the year is always a decisive factor for the success of this technique.
The first shot
Found the person who will be our main player, we can start preparing the first of two shots that will make up our double exposure.
Here enters the snoot we have applied to flash before you get into the water or in any case before approaching the scene where we’re going to operate. This is to avoid lifting the suspension and / or to frighten the main subject with rash movements.
It seems obvious that we should have a good familiarity with the use snoot otherwise it will be impossible to achieve a double decent exposure.
We will now decide whether to double exposure on the frame horizontally or vertically and then set up the flash with the snoot at the right distance from the scene to be framed so as to get the first shot in the frame portion that we wish.
This whole operation is definitely the most complex and more difficult as we have to do some tests with the snoot of a fictitious person, moving a bit ‘from the main game, inserting the mask that allows us to get the snoottata that best befits the size of the main subject and the distance that we want or we will be forced to comply in performing shooting.
We will do a series of test shots using obviously the pilot light and correcting slightly each time the position of the flash with the snoot through small movements of the arms until we find the optimum position and at this point serreremo strongly terminals of the arms to avoid losing it.
Absolutely we do not try to use the flash with freehand snoot because this solution then we will not repeat the same snoottata in successive series, thus depriving us of the ability to make those corrections the micrometer lit scene that are almost always required during a series of double exposures.
This will take a lot of time and patience especially to those who are not very familiar with the use snoot but it will be essential to ensure the success of our double exposure. As long as we take a little ‘hand and the eye there may take ten to twenty minutes to achieve a correct positioning of the snoot on the subject. Then with practice everything becomes easier and faster.
Without this we will approach with great caution and circumspection to our main subject and when this will be illuminated by the pilot light will do a couple of test shots to see if the image of snoottata the frame corresponds to our expectations, otherwise we will make small adjustments to the position of the flash and snoot.
Personally recommend the first shot on the main subject at 1/250 at 100 f.22 Iso in order to have the part of the frame is not impressed by snoottata completely black and shadowless from the unlit scene, shadows that if we are in a very sunlit area often they appear also forcing us to reduce the shutter speed up to 1/320 and to further close the iris to F.32.
At this point we are ready to realize what will be the first shot of but before we do our double exposure absolutely must remember to include in the “Shooting Menu” of our camera the “Multiple Exposure function” by clicking on “YES (single photo)”, “number of shots 2” and leaving off the automatic gain, this because otherwise the machine will automatically compensate the exposure of the two shots, creating annoying shadows and overlapping of the two scenes.
To confirm that we have properly inserted the multiple exposure function will appear on the top screen of our camera a symbol that depicts two overlapping panels (I always refer to the Nikon D800E).
The second shot.
Made the first shot, we verified that this corresponds to our expectations in the image composition we will have achieved the most complicated and difficult part of our double exposure, admitted that with the second shot we have set ourselves to place the sun taken from below the surface. But if by the second shot we want to put in the frame to another main subject then we will have done half the work because it will be to repeat what has been achieved with the first shot.
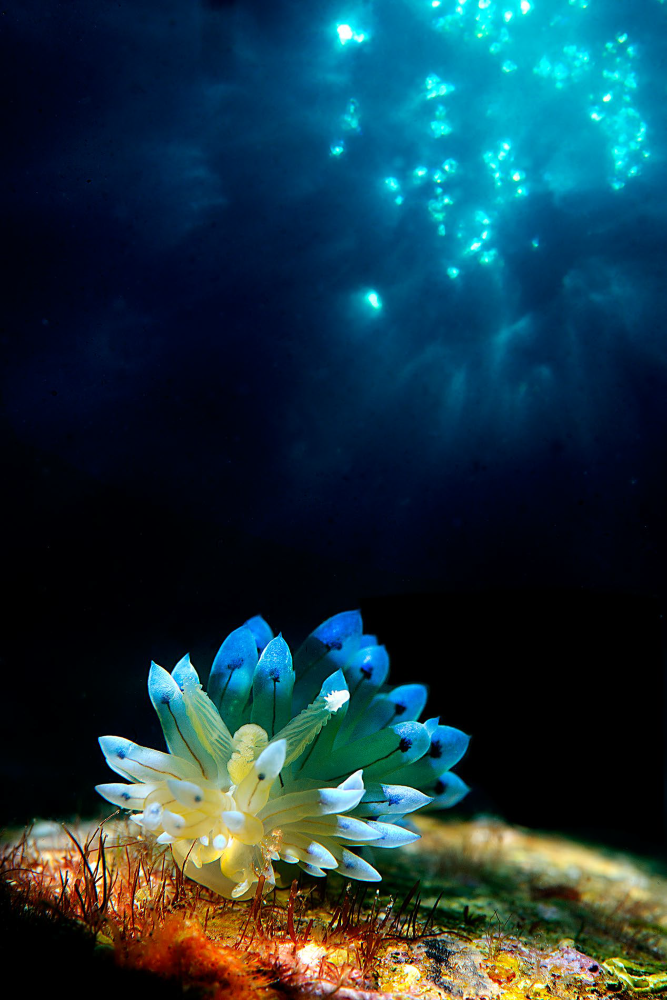
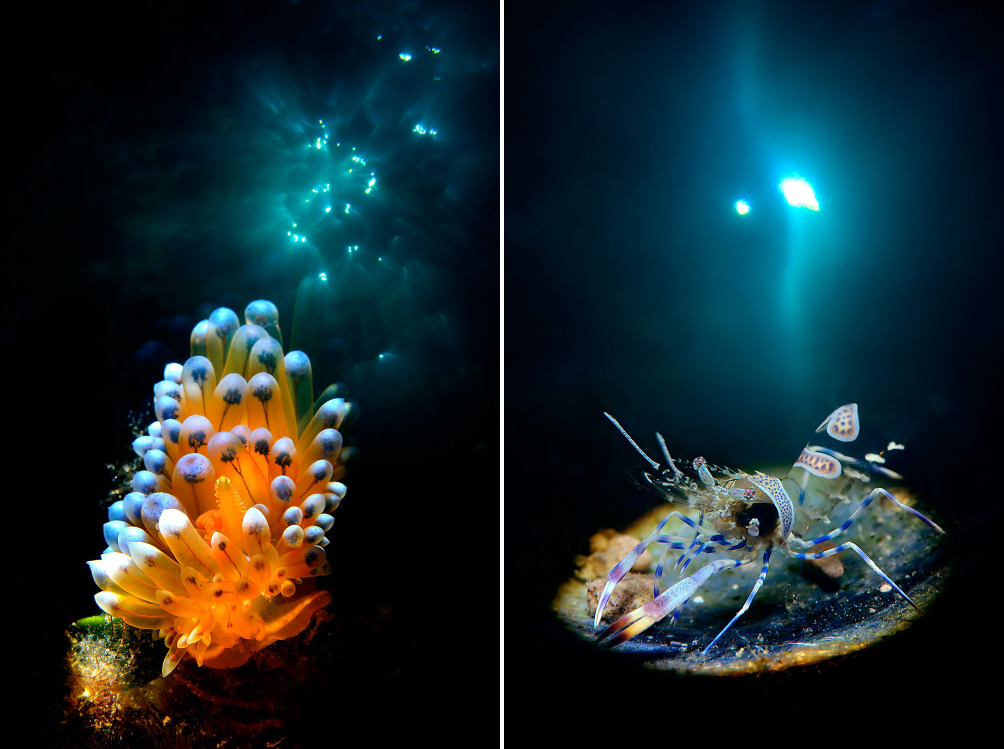
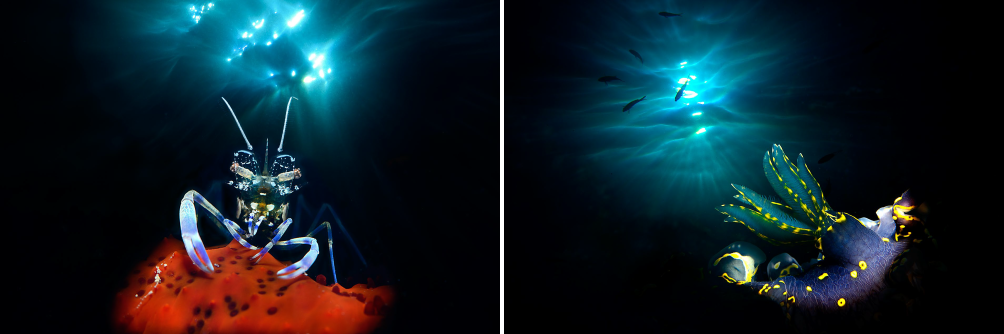
But let us assume that in our project there is the insertion of the solar rays reflected from below the sea surface, which occurs in the majority of cases to create a photograph that in its composition is pleasant and not overly artificial.
At this point we will have to turn away a few meters from the primal scene with great caution so as not to lift the suspension and to not scare our main subject we will have to act as lead actor for subsequent series of shots.
To realize how long we will have second shot before the function “Multiple Exposure” vanishes ?
The time that we already undergoing the camera dry preparation we will have entered the “Custom Settings menu” in the set C “Timers / AE lock” the box c2 “Switch-off delay. meter “, time that I hold fixed in a minute but for the less experienced advice to fix in 5 minutes, remembering, however, that this results in a slight increase in battery consumption. Let us remember also that the timer starts from the moment you activate the “Multiple Exposure” function and therefore also includes the time that we have used to make the first shot.
After we separated us from the primal scene we will change the exposure time and aperture, reducing them dramatically up to values between 1/2000 and 1/5000 for the times and F.32 for the diaphragm. The choice will be a function of our distance from the surface and the intensity of the solar rays. It ‘a good idea to try to do a couple of shots to sunlight before starting the double exposure so as not to waste good primary shots with overexposure exaggerated the second shot.
Placing them in the sunlight of the frame is not engaged by the first shot, it will shoot only when we are sure to have them in perfect focus, something not so easy especially when non-clear waters.
After verifying the success or failure of our double exposure will repeat the operation…if we have still want and considering that within one hour of diving if we can do five good series we will be amply satisfied.
Conclusions.
I hope to have contributed this article to clarify the various aspects of the procedures to obtain this kind of double exposure which very often snubbed or worse is considered as something dishonest or artificial.
This is a technique that requires great knowledge and respect of the marine environment and its inhabitants, a lot of dedication, patience and familiarity with the equipment, but that allows to obtain images that enhance the beauty of this element so dear to us.
If after reading these lines and seeing my pictures even one of you will feel encouraged to try this technique I will have achieved my goal.
 WORDS and PICTURES by Adriano Morettin
In collaboration with